Showing posts with label Cake and Desserts. Show all posts

Tuesday, October 25, 2011

A Sweet Divali - Kurma, Gular Jamoon and Barfi.

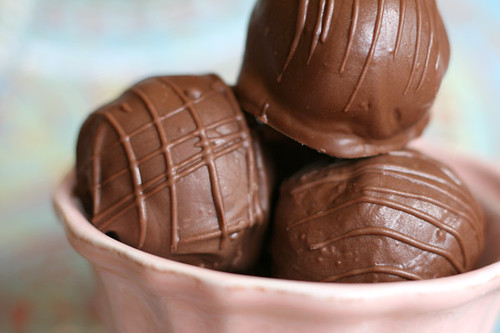
Typical Indian sweets
Kurma, gulab jamoon and barfi are some of the most popular sweet dishes served in Divali time.
Trinidad is a multicultural island, and we all celebrate Divali regardless of the religion the everyone practice. We celebrate with the Indian community the victory of goodness over evil and light over darkness.

This celebration is very colorful and people decorate their houses with light, people dress the colors of devali and the women in particular enjoy the time wearing really bright color, shine and light, a lot of jewelery ... it is just beautiful.

Devali is like Christmas for the Indus, people get together around a table full of good food, sweets and lights.  In this post I brougt three recipes of ome of the most popular sweets for the season, I hope you enjoy it.

Happy Diwali to Everyone, Deepavali Valthukka!! Shubh Diwali!!!

Decoration lights
Typical women outfit to celebrate Devali, I just love it!!


Kurma
Yield: 300 sticks

2 lbs. all purpose flour.
200 gr. butter.
2 oz. fresh ginger, grated.
1 tsp. Cardamon (elychee), ground.
1 tsp. Cinnamon, graund.
1/2 tin. condensate milk.
4 fl. oz. evaporated milk.
3 fl. oz. water.
vegetable oil for frying.

Syrup (Phaag)
16 fl. oz. water.
250 gr. granulated sugar.

  1. Combine flour, butter, ginger, cardamom and cinamon, rubbing to create a consistancy like fine bread crumbs.
  2. Combine  all liquid ingredients. And add it to the mixture made in the step one (1) to make a soft dough, allow o rest for 20 minutes.
  3. Divide dough into two equal parts: roll dough 1/2 in. thick.
  4. Heat oil in an iron pot over medium heat.
  5. Cut dough into 3-in strips.
  6. Fry until golden brown , drain on absorbent paper and place in a large bowl.
Syrup: In a pot pour water and sugar to boil until mixture become slightly thick in consistancy. Pour over fried dough , turning continuosly until sugar crystalises.


Gulab Jamoon
This dish is commonly knowns as "Fat Kurma", the trinidadian version of this sweet is a deep fried flour mixture drizzled with a sugar glaze. In autentic Indian cusine, the Gulab Jamoon is deep fryed milk dough soaked in heavenly sweet syrup.

Yield: 50 units
450 gr. white flour.
8 oz. butter.
450 gr. powdered milk.
1 tin condensed milk.
4 fl. oz. evaporated milk.
4 fl. oz. water.
1 tsp. cardamon (Elychee), ground.
1 tsp. cinnamon, ground.
2 tsp. fresh ginger, ground.
Vegetable oil for frying.

Sugar Glaze
12 oz. icing sugar.
1/4 cup. warm water.

  1. In a large bowl mix flour, butter and powdered milk.
  2. In a separate bowl, mix condensed milk, evaporated milk, water and spices.
  3. Add the milk and spices mixture to the dry ingredients.
  4. Mix to stiff dough, cove with a damp cloth to keep dough fiirm and prevent craking.
  5. Heat oil in an iron pot.
  6. Brak dough into small pieces and form into almod shapes (3" length and 2" thickness)
  7. Fry over low heat until golden brown; rmove and drain on absorvent paper.
For sugar glaze:
Mix together icing sugar and water to a thick glaze. Dip the fried Gulab Jamoon into the glaze and layout on a baking sheeet, to dry.


Milk Barfi (Barfee)
Barfi is a very popular sweet in Trinidad in special for weddings and Divali. The main ingredients for theis sweet is milk and sugar topped with sweet cake sprinklers.

Yield: 2 dozen
16 oz. cream (tin).
500 gr. powdered milk.
450 ml. water.
250 gr. granulated sugar
1 tsp. fresh ginger, ground.
1 tsp. cardamom (elychee)
few drops of Rose Water.
100 gr. butter.
2 oz. cake sprinklers for garnish.

  1. Rub the cream into the powdered milk, to create a consistanncy of fine breadcrumbs.
  2. In a heavy sauce pot bring water to boil, sugar, ginger, cardamom and rose water.
  3. Allow sugar mixture to formlight syrup.
  4. In a large bowl, please the milk mixture and add the sugar mixture, turning constantly to avoid lumps.  The mixture should form a ball not too soft and crumbly.
  5. Grease a flat square dish with butter.
  6. Using a spatula, spread mixture evenly, smooth the top and add sprinklers.
  7. It's important to cut into squares before it completly cools.


Recipes from: Premchand Malloo, Malloo's Catering Services, Trinidad & Tobago.

Trinidad food

Wednesday, October 5, 2011

Chocolate Cake Recipe for Beginners

Chocolate Cake -  only for reference
I really wanted to share this recipe with my readers. I really enjoyed making this chocolate cake last weekend in house of my friend Francisco. I own you the pictures, but my camera was without batteries at the time of the making (I was taking pictures of my son the entire day).

Francisco's wife called me early last week to help her making a cake for Francisco's birthday, that we were going to celebrate over the weekend. My friend Francisco is Venezuelan  and a chef, and he wanted a chocolate cake Venezuelan style. Venezuelan style means for us very soft and moist, the sponge cake from Trinidad is a little bit heavy for what we are use to.

This cake was fantastic, I borrowed the recipe from my mom, she found the recipe I do not where, and the result was fantastic. Even more I can call it the foolproof Chocolate Cake. This is the perfect cake for whom do not have much expericen baking.


CHOCOLATE CAKE (difficulty: NONE)

2-1/4 cup of flour
1-2/3 cup sugar
2/3 cacao (powder)
1-1/4 tsp baking soda
1/4 tsp baking powder
1-1/4 cup of water
3/4 cup of butter
2 eggs
1 tsp of vanilla
2 tbsp of butter to grease the molds
2 tbsp of cocoa in powder to cover the molds.
Pre-heat oven at 350 F (180 C)

  1. Prepare two cake molds (6" x 2") with the butter and sprinkler with cacao.  Another way to prepare the molds is grease the molds with butter and line them with wax paper.
  2. Measure carefully all ingredients.
  3. Put all the ingredients together in the mixer's bowl with the exception of the eggs. Do not break the eggs on the bowl's mixer, break them on another bowl and then add to the rest of the ingredients.
  4. Beat the mix for half minute at low velocity; increase the velocity to medium speed and beat the mix for three (3) more minutes.
  5. Pour half of the the mix in each mold.
  6. Bake for 30 minuts or push a skewer in the centre, it should come out clean and the top should feel firm.
  7. Leave to cool in the tin, then turn out onto a wire rack to cool completly.
  8. when the cake is cold, decorate it with buttercream.

See recipe for buttercream here. I did a variation of this buttercream recipe (coffee buttercream, I love tha coffee flavour with chocolate)  adding 2 tsp of instant coffee disolved in 2 tbsp of water.

I hope you enjoy it!!!

Saturday, June 4, 2011

Butter Sponge Cake Recipe


This is the recipe given by my Teacher at the Cake Decoration Course Level 1, at UWI Open Campus.  the mix is enough to make 12 cup cakes and a 6-in cake, well that it is what I made with this mix. The cake is similar to the Moist Yellow Cake but a little bit more spongy and it is not that sweet. This is a basic cake and you can make variation from this recipe as you wish.

I made this cake for my Petunia Decoration Cake and my cup cake with buttercream frosting. And I sprinkler the frosting with those nice color little candies. I adde to the mix some almods but that is optional Enjoy it!!!

All my friends loved the cup cakes and the frosting. I found that they look so cute!!!


Ingredients.
1 lb margarine
2 cups sugar
6 eggs
4-1/2 cups flour
6 tsp baking powder
2 cups milk
1 tsp vanilla essence

Optional: almonds and risings
  1. Grease and paper -6" cake pan and a set of 12 cupcake pan- with greaseproof paper.  Brush with melted margarine or shortening. Sift dry ingredients.
  2. Measure accurately, have all ingredients at hand before starting to make the cake.
  3. In a mixing bowl mix the butter with the sugar  with the electrical mixer until is soft and light, add sugar gradually and continue creaming until the mixture is light and fluffy.
  4. Whip eggs in another bowl until thick and leave a "ribbon" when beater is drawn across the top.
  5. Pour at once the eggs into creamed butter and sugar, and fold into creamed butter and sugar, if mixture shown signs of curdling, fold a little flour in.
  6. Fold flour and milk into mixture alternately, allowing flour to be the last addition.
More Directions:
  • For cup cakes, line the cup cake pan, fill the liners 1/2 way. Pre-heat the oven at 400 F, and place the cup cake on the top shelf of the oven. Bake until they are light brown on the sides of the tin. Cake most be just light brown.
  • For cake, reduce the oven at 350 F. Place cake on the top shelf  of the oven do not allow the cake pan touch the side of the oven. Bake for approximately 45 minutes or until skewer  inserted comes out clean. Remove from oven, place on a cake cooler, leave for 15 minutes before removing from tins.
Use buttercream to decorate cup cakes. Tip No. 2D (a big drop flower tip, perfect for this type of decoration)


The cup cakes  before frosting

My beautiful decorated cup cakes with vanilla buttercream
The decorated cupcakes from on top

Coming out from the oven

I add some almods and risins on top before baking


Wednesday, May 25, 2011

The Perfect Cookies and Biscottie for My Coffee

This morning I was thinking  in the Italian Bisquetes that I used to make long time ago, and how delicous are with "Cafe con Leche" (coffee and milk) well for me is more milk than coffe. My mom, used to make the coffe from scrach,  no sugar, light. Put it in the blender and add powder milk... turn it on for some seconds, and the result, a creamy, foamy cofee milk, then I added suggar to taste. Here

Back at home in Venezuela, I used to have cofee milk, very often. Before going to work, at work twice (morning and afternoon) and some times with my dinner. I cannot remember to have problem to sleep or feeling hyper. Basically at home we prepare the coffee as I mentioned before.

Other type of coffee that I love is the espresso,  I ussually had this type of coffee in any bakery in Venezuela with biscotti (Italian biscuits) or "cachitos", a bread filled with ham and bacon, very delicous...with those memories in my mind, I was looking in the net for some good cookies recipes that I can have with my coffee milk and I found this page Delonghi, with some wonderful cookie recipes that I will share with you.


Amaretti Biscuit


These delicious crumbly almond biscuits are very famous, and are often found in Italian coffee bars individually wrapped in beautiful coloured paper. (Makes Approx 30 biscuits)

Ingredients

  • 4 eggs, whites only
  • 350g caster sugar
  • 400g ground almonds
  • 2 tablespoons Amaretto liqueur
  • Handful of flaked almonds to decorate (optional)
  • Icing sugar to decorate (optional)

Method

1. Preheat the oven to 170C/325F/gas 3, and line a baking tray with edible rice paper, lightly greased with some butter.

2. Whisk the egg whites in a large clean bowl until firm, and then gently fold in the sugar and ground almonds.

3. Fold in the Amaretto liqueur until everything is thoroughly mixed together (don’t worry if it looks lumpy), and then use a teaspoon to place small heaps onto the baking tray, making sure to leave an inch around each of the heaps as they will increase in size whilst baking. Press a flaked almond onto each amaretti heap.

4. Bake for 15 minutes or until golden brown, and then remove from the oven and leave to cool. Once cool enough to handle, peel the biscuits away from the rice paper. It is normal for some rice paper to be stuck to the bottom of the biscuits; this is fine as rice paper is edible. Lightly dust with sifted icing sugar if desired.

Perfect alongside an espresso.

You can make also the espresso on the stove, chick here for direction.


Cinnamon and Hazlenut Biscotti

Cinnamon and Hazlenut Biscotti

‘Biscotti’ meaning ‘cooked twice’ are traditional Italian biscuits that are characteristically very crunchy due to being baked twice. They are perfect when dunked into your favourite Italian coffee! (Makes Approx 15 biscuits)

Recetas for some Italian coffee, click here.

Ingredients

  • 150g plain flour, plus a bit extra for dusting
  • 110g caster sugar
  • 1 large egg
  • 1 teaspoon baking powder
  • ½ teaspoon ground cinnamon
  • 100g toasted hazelnuts, chopped

Method

1. Preheat the oven to 180C/356F/Gas 4 and line a baking tray with greaseproof or silicone paper, lightly greased with butter

2. In a large bowl, use a wooden spoon to thoroughly mix together the flour, sugar, egg, baking powder, and cinnamon until a soft dough is formed. Add more flour if necessary if the dough is too sticky.

3. Once you have a soft dough, flour your hands well and lightly kneed the dough, mixing in the hazelnuts. Turn the dough out onto a well-floured surface, and roll it into a thick log shape. Press down lightly on top of the log to flatten it slightly. Place the biscotti log onto the greased baking tray, and bake for 25 minutes or until golden.

4. Remove the biscotti log from the oven, and leave to cool slightly. Leave the oven on.

5. When the biscotti log is cool enough to touch, slice it into diagonal slices about 2cm wide and rearrange the slices onto the baking tray. Return to the oven, and leave to dry out for around 10 minutes. Remove from the oven and leave to cool on a wire rack. They will continue to harden as they cool.

Your biscotti will now be very crunchy, ideal for dipping in a strong espresso to soak up all of the wonderful coffee flavour.


Lemon and Pistachio Biscotti

Lemon and Pistachio Biscotti


‘Biscotti’ meaning ‘cooked twice’ are traditional Italian biscuits that are characteristically very crunchy due to being baked twice. They are perfect when dunked into your favourite Italian coffee! (Makes Approx 15 biscuits)

Ingredients

  • 150g plain flour, plus a bit extra for dusting
  • 110g caster sugar
  • 1 large egg
  • 1 teaspoon baking powder
  • Zest of one unwaxed lemon
  • 100g unsalted pistachios, shelled

Method

1. Preheat the oven to 180C/356F/Gas 4 and line a baking tray with greaseproof or silicone paper, lightly greased with butter

2. In a large bowl, use a wooden spoon to thoroughly mix together the flour, sugar, egg and baking powder, until a soft dough is formed. Add more flour if necessary if the dough is too sticky.

3. Once you have a soft dough, flour your hands well and lightly kneed the dough, mixing in the lemon zest and pistachios. Turn the dough out onto a well-floured surface, and roll it into a thick log shape. Press down lightly on top of the log to flatten it slightly. Place the biscotti log onto the greased baking tray, and bake for 25 minutes or until golden.

4. Remove the biscotti log from the oven, and leave to cool slightly. Leave the oven on.

5. When the biscotti log is cool enough to touch, slice it into diagonal slices about 2cm wide and rearrange the slices onto the baking tray. Return to the oven, and leave to dry out for around 10 minutes. Remove from the oven and leave to cool on a wire rack. They will continue to harden as they cool.

Your biscotti will now be very crunchy, ideal for dipping in a strong espresso to soak up all of the wonderful coffee flavour.


Thursday, April 28, 2011

Chocolate Covered Cake Balls


Hi my friends,  this is my second time making cake balls (a version of the cake pops without the stick), I bought the book Cake-Pops by Bakerella, Angie Dudley
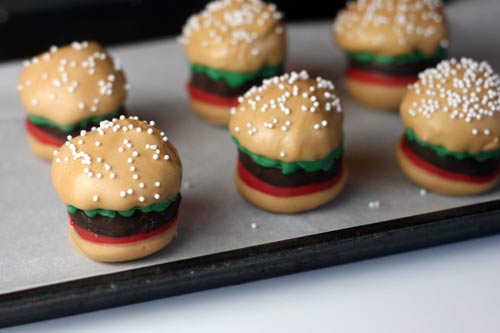
, a while ago and I have tried to make them at home, first for my baby first birthday party last February and last week for my friend's husband birthday party. I have to confess that this is the easier thing I have ever made in the kitchen. The only problem for me was to find the Candy-melt from Wilton,  in the city where I live, forget mail order, that does not work here.

Both times I got at the point of frustration trying to get the same finish that Bakerella has in her blog or book. If you can get the candy melts, you are done. I had to cover the cake pops with baking chocolate, the flavour is very rich and people really like it, but the price goes up, and temper the chocolate is not easy. But I did my try and it was perfect. At lesat for me and the time that I have available to make 4 dozen cake balls.

I was in a hurry packing everything to go to my friend party, so I take the picture just after covering the cake pops.


Chocolate Cake Balls:
Source: CAKE POPS, Tips, Tricks and Recipes for More than 40 Irresistible Mini Treat by Bakerella,  page 11.
Pictures: Karina Espinoza-Gift

(Makes 48 cake balls)

You'll need
18.25 ounce box cake mix - chocolate or other favorite flavour
9-by-13 inchcake pan
16-ounce container ready-made frosting
Large metal spoon
Plastic wrap
32 ounces (2 pounds) candy coating or baking chocolate
Deep, microwave-safe plastic bowl
Toothpick
Resealable plastic bag or squeeze bottle (optional)

1. Bake the cake as directed on the box, using a 9 x 13 inch cake pan. Let cool completely.

2. Once the cake is cooled, get organized and set aside plenty of time  (at least and hour) to crumble, roll , and dip 4 dozen cake balls.

3. Crumble the cooled cake into a large bowl (as you see in the picture below). You should not see any large pieces of cake.


 4. Add three-quarters of the container of frosting (you will not need the remaining frosting).  Mix into the crumbled cake. Using the back of a large metal spoon (or your hands -very clean), until thoroughly combined. If you use the entire container, the cake balls will be too moist.


5. The mixture should be moist enough to roll into 1-1/2 inch balls and still hold a round shape. After rolling the cake balls by hand, place them on a wax paper-covered baking sheet.


 6. Cover with plastic wrap and chill for several hours in the refrigerator, or place in the freezer for about 15 minutes (I took this option, I did not have too much time). You want the ball to be firm but not frozen.


7. Using Baking Chocolate: Place the chocolate in a deep, microwave-safe plastic bowl. Follow the indication from the manufacturer to melt the chocolate in the microwave. Work with 16 ounces of chocolate at a time. When the chocolate is melted and shiny (do not try to add any liquid, butter or anything - from experience, if you add any thing the texture of the chocolate will change at the point that will be imposible to use it).

8. Coating: Take a few cake balls at a time out of the refrigetrator or freezer to work with. If they are in the freezer transfer the rest of the balls to the refrigerator at this point, so they stay firm but do not freeze.

9. Place one ball at a time (as shown in the picture below) into the bowl with candy coating or melted chocolate. spoon extra coating over any uncoated areas of the cake ball to make sure it is completely covered in  candy or chocolate coating. Then lift out the cake ball with a spoon. Avoid stiring it in the coating, because cake crumbs can fall off into the coating.
10. Holding the spoon over the oer the bowl , tap the handle of the spoon several times on the edge of the bowl until the excess coating falls off and back into the bowl. This techniques create a smooth surface on the outside of the cake ball.

11. Transfer the coated cake balls to the second wax paper-covered baking sheet to dry. Let the cake ball slide right off the spoon. Some coating may pool around the base of the ballsonto the wax paper - as you see in the picture below. If so simple take a toothpick and use it to draw a line around the base around the cake balls before the coating set. Once the coating sets, you can break off any unwanted coating.

12. Repeat this with the remaining cake balls and let dry completly.

13. Decorate the cake balls, with sprinklers or with the remainin chocolate or candy coating, pour the coating in a squeeze bottle and drizzle it over the tops in a zigzag motion to decorate.

14. You can make the cake balls ahead of time and store them in an air tight container on the counter or in the refrigerator for several days.


Some Cake Balls decoration ideas

Cake Balls

July cake pops

Box of Cake

Burger Cake Bites


LinkWithin

Related Posts Plugin for WordPress, Blogger...