The character cake is one of the most popular cakes, that's why my teacher wanted to show us how to make it. This type of cake is very popular for children parties and it is very easy to decorate. you just need to get a
character cake pan
, some icing and gel color and start practicing.
There are basically 2 techniques used for character cakes. Definitions and techniques has been taken from the book
Decorating Cakes
by Wilton. Here the techniques:
OUTLINE: Character cakes are usually outlined first, then piped with the start or any other technique used. Outline facial features, outline the shape of the character, etc.
Tip No. 3
Icing Consistancy: Thin
Bag Position: 45 degrees
Hold Tip: slightly above surface.
START FILLING IN: The character cake are usually decorated with stars. Those stars need to be be very close together, stars require so much piping from the same bag, It is a good idea to keep replenishing the icing. Change the icing when soft, otherwise the stars will eventually be poorly defined.
Tip No. 16
Icing Consistancy: Medium
Bag Position: 90 degrees, straight up
Hold Tip: 1/4 inch above surface
Very Important: when you fill the character cake with the stars, pipe a row of stars evenly and close together, adjusting the tip position slightly each time
MY LITTLE HERO CAKE
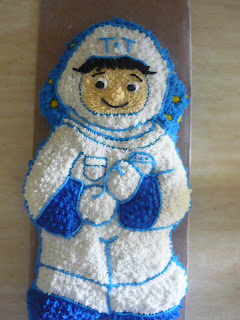 |
| My T&T Astro Kid |
For this cake I use a
Little Hero Pan
from Wilton, I loved this pan since I saw it in the store because g
 |
| Astro Boy by Wilton - Little Hero Pan |
ave me 4 decoration options, the fire fighter, the soldier boy, Astro Kid and a police. I am the mother of a 15 month old boy, so this pan is the right choice for me. I decided to make the Astro Kid.
The good thing about
Wilton Character Cake Pans is that they came with instructions for baking, how to use the decorating bag and couple, recipe for butter cream icing, how to decorate the cake and every thing you will need to complete the project.
For this project I used a
chocolate cake mix , but you can use your favorite recipe, I suggest you the moist yellow cake, it is very good all the time. Or your favorite chocolate cake recipe.
I did not made it quite like in the instruction, but here you have the list of color from
Wilton Little Hero Pan. I followed the instruction but due to availability I used other colors or I changed the design somehow. But I love my own T&T Astro Kid. Other Ideas how to use the same cake pan, see
here.
NOTE: follow the baking instruction that comes with the cake pan, very important!!!
You will need:
Tips:
# 3 for outline the cake
# 16 (star tip) for the face
# 18 for the entire body
Make 5 cups of
butter cream icing, tint them with
food color in gel as follow
1-1/4 cup blue (all around the cake and outline the cake)
1 cup dark blue - use small amount of black (for the shoes and part of the arm shirt)
1/4 cup black (eyes, mouth, hair)
1/2 cup copper (I combined red and yellow in a very small proportion to get the skin color)
1/4 cups yellow (for the stars around the boy and around the head)
1-1/2 cup of white (for the body)
Mix very well the colors in separate containers, for bright colors add color with a toothpick. Add color and mix properly until you get the color that you expect, for bright color you have to add a lot of this
color gel.
...Well I did not read all the instruction, but I should had trimmed the ears, hose and arm extension off the cake, in other words, whatever thing that you do not need from the original cake design.
.
1. Outline the cake with tip # 3 (blue color), outline helmet, arms, shoes, legs, packets, etc.
2. With the star tip No. 18 and white
butter cream start making stars and cover the cake, make sure that the stars are very close together and not pointing.
3. With the same star tip, but with dark blue color, fill the shoes area and the end of the arm shirt.
4. Add the stars around the body in yellow icing.
5. Add stars in blue (same color used to outline the body) around the head and on the sides, be careful to do not cover the "yellow stars".
6. Apply the copper color for the face, star tip # 16, leave space for the eyes. To make the nose, overpipe three layers of stars to build up the nose.
My beautiful Astro Boy almost done!!!
7. For the eyes, with Tip No. 3 and white icing make a flat dot and then with the same tip # 3 and black icing make a small flat dot . With same tip outline the eyebrow and mouth. Change tip to # 16 and make pull out stars to make the hair.
8. I use blue color and tip No. 3 to write T&T (Trinidad and Tobago)... I did not have any flag available at that time.
Here my lovely Astro Kid, I had such a good time decorating this cake, It is a lot of work when you are not accustom to squeeze the decorating bag so often, and my hand was hurting me. But I was happy with the final product.
|
| My T&T Astro Kid |
Pick a character cake for your next birthday and enjoy it the jurney!!!


 and a set of
  - with
  mix the butter with the sugar with the
  until is soft and light, add sugar gradually and continue creaming until the mixture is light and fluffy.
 , fill the liners 1/2 way. Pre-heat the oven at 400 F, and place the cup cake on the top shelf of the oven. Bake until they are light brown on the sides of the tin. Cake most be just light brown.
 , leave for 15 minutes before removing from tins.
 (a big drop flower tip, perfect for this type of decoration)


